
For sometime now the hospital grade white colour of the Wii’s casing has bothered me, as it stood out like a Storm Trooper at Goth party when sitting next a slew of black and silver components that make up my entertainment system. I was also very disappointed when there was no alternate colour options when purchasing the Wii on launch day even though many images circled the internet indicating that various colour options were available, so my only solution was either apply a vinyl skin or completely replacing the outer casing. There’s a humungous amount vinyl skin designs available with some of them having really nice looking designs but after some careful thought I decided not to take the easy way out, plus I knew once the skin is applied the surrounds of the white buttons would still be visible. I ended up enlisting the services of Ozmodchips and purchasing a Wii evolve Black Kitana replacement case, there are other brands and colour options available if you search around but for what I wanted the Kitana case will do the job.
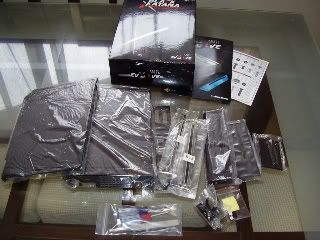
The Wii evolve Black Kitana replacement case kit comes neatly packaged with the following items:
- A complete replacement Black Wii casing
- A pre assembled DVD entry
- 3 colour options for DVD drive entry light
- Detailed assembly instructions
- Black replacement rubber feet and stickers to mask screws
- A tri-wing screwdriver
- A Philips screwdriver
- Tweezers
- Styrofoam work block
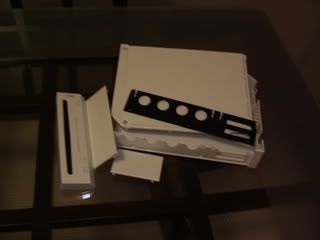
Disassembly and reassembly of the casing
As daunting as it may look stripping apart your Wii isn’t that difficult as it seems anyone with a very basic knowledge of electronics and some patients can complete this task. This all can be completed by using the supplied instructions but if they’re not detailed enough for you there’s a plethora of tutorials on the Internet some with step by step video instructions. I completed the case change over using what was supplied in the kit with the only addition being a flat head screw driver to assist in removing some stubborn plugs.
There’s no point in me taking you through each step, as mentioned above instructions on doing this are littered around the Internet To give you a basic idea of what’s involved I suggest you do a quick search on Youtube or Google to make certain you’re up to the task before purchasing a replacement case kit.
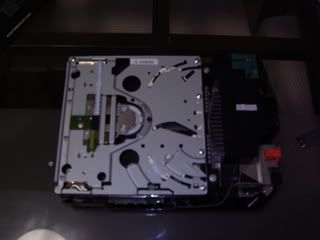
In short once you have removed top part of the casing and the internal components of the Wii are exposed, the instructions will ask you to slowly strip apart one layer of Wii’s components at a time. All you have to is take your time and be patient as some parts of the Wii components are quite fragile, also to help streamline the reassembly process I suggest you group the components with their screws with each step, this way there’s no hunting around for which screw goes where later on, but if you do manage to mix up some of the screws a supplied screw guide that corresponds with the main instructions comes with the kit that indicates what screw goes where and how many of each you should have.
The only fiddly parts of the process is removing and replacing the screws that hold the DVD drive in place, as these screws a sunken deep into the unit and require the use of tweezers to fish them out (it’s a bit like that old board game, Operation). Another thing that may have you taking a few steps backwards after going forwards is some cables need to folded neatly out of the way for everything to fit flush. I’m no tech guru and I’ve never pulled apart a current generation video games console before so if can do I’m sure everyone else can.
Overall Verdict
All I really wanted out of this endeavour was to change my Wii from white to black and the Wii evolve Black Kitana replacement case kit did the job and came with all I needed to get the job done. The Black Kitana kit is not entirely perfect as there are some negative points to go with the positives.
The good points
The ease of assemble and disassembly was a bonus and by adding a completely assembled black disc drive front saves heaps of time fiddling around. Also including a three disc drive illumination colours was a nice touch allowing you a little more customization, I decided to go for a red light as I haven’t seen many Wii’s with a red disc drive light and it seemed fitting to add the red drive light to a black Wii.
All the external connections from the power cord right down to memory card slots for the Game Cube all function like they did in their previous standard guise. The power button, reset button and disc eject button all click and function as they previously did. Take a few small steps back and the Kitana case looks like it belongs there with its shiny gloss back finish, and blends in nicely with the majority of today’s home entertainment appliances and components. From doing a simple touch test it feels as though the gloss back casing has done nothing to hinder the Wii’s heat dissipation.
The bad points
Over all the supplied instructions were detailed and comprehendible, except for a one thing.... they printed instructions of how to fit a black Wii case on black paper, that has to be one of the most stupid things you could do when desiging a layout for a set of instructions. Once you reach the point of reassembly you find your self wasting time squinting at the instructions trying to figure out which way the Wii is facing, now seriously it wouldn’t matter what colour the diagrams were as long as they aren’t the same colour of the background.
One thing that was left out of the kit was a black Wii stand, the originally supplied Nintendo item has to be reused and doesn’t seem to contrast to well with the new colour, I was surprised that this wasn’t included because the majority of its market competitors have included a matching colour stand.
I did mention in the good points that the Kitana case looks nice once you have taken a few steps back, but faults begin apparent when closely inspected. Some of the things I’m about to mention may not bother some people and it may seem I’m being a little picky. The logos that indicate what each button is for on the front of the Wii have been replaced with their own designs, the Wii logo below the disc drive has been chopped in half to run with the whole ‘Kitana theme’ all of this gives a slight look of cheapness to the completed case. To further add to the cheapness look, production moulding marks are still visible on the dead centre of each side of the case, the dark colour does help to mask this though.
The SD card slot cover and the Game Cube controller/memory card covers don’t snap lock like the original Nintendo ones did which just screams ‘aftermarket’ and as much as I like the new coloured disc drive options I do have to complain about the lack of vibrant illumination when compared to the original Nintendo version.
Don’t let my minor complaints throw you because Wii evolve Black Kitana replacement case is still value for money and I am pleased with the end result. If black isn’t your colour of choice Talismoon do offer a good variety of solid and transparent colours and there’s many other companies out there making cases like this.
Overall Rating 8/10


1 comment:
Gee, I've always loved the i-pod-like whiteness of the Wii.
But I always wondered what the wii would look like with other colour disk Drive lights...
Post a Comment